
Protect your family with pure water for drinking, bathing, and appliances.
A finer micron rating can add resistance, but a sudden pressure drop after a cartridge change often points to a cartridge that isn’t seated correctly or another restriction in the water path. Troubleshooting low pressure in a reverse osmosis system in Perth should start by checking the cartridge, tubing and valves, then the pre-filters, membrane and storage tank. With the tank full, a domestic system typically delivers 1-2 litres per minute.
If flow slowed immediately after servicing, start by checking the replacement cartridge. Different filter media or a finer micron rating can affect flow, as can a kinked hose or partly closed valve.
This guide shows you how to compare flow, spot common restrictions and assess tank air pressure before deciding what to do next. It also explains why a coarser cartridge is not an automatic fix, and when the system may need a closer inspection.
Key Takeaways
- Measure the filtered tap’s flow and note whether the slowdown affects other taps or only the RO outlet.
- After a cartridge change, check that it’s seated correctly and inspect the tubing, fittings and valves for restrictions.
- Assess pre-filter condition and membrane age when water production gradually slows or the storage tank takes longer to fill.
- If the tank fills but water runs slowly from the tap, consider tank air pressure and restrictions between the tank and outlet.
- Don’t switch to a coarser micron rating just to increase flow; filtration performance can change with the cartridge.
Can a micron rating affect water pressure?
Yes, a finer micron rating can increase resistance, depending on the cartridge’s design, media and surface area. Perth water quality or hardness does not determine outlet pressure on its own, but captured material can restrict flow as a cartridge loads.
-
Distinguish Low Pressure from Low Flow
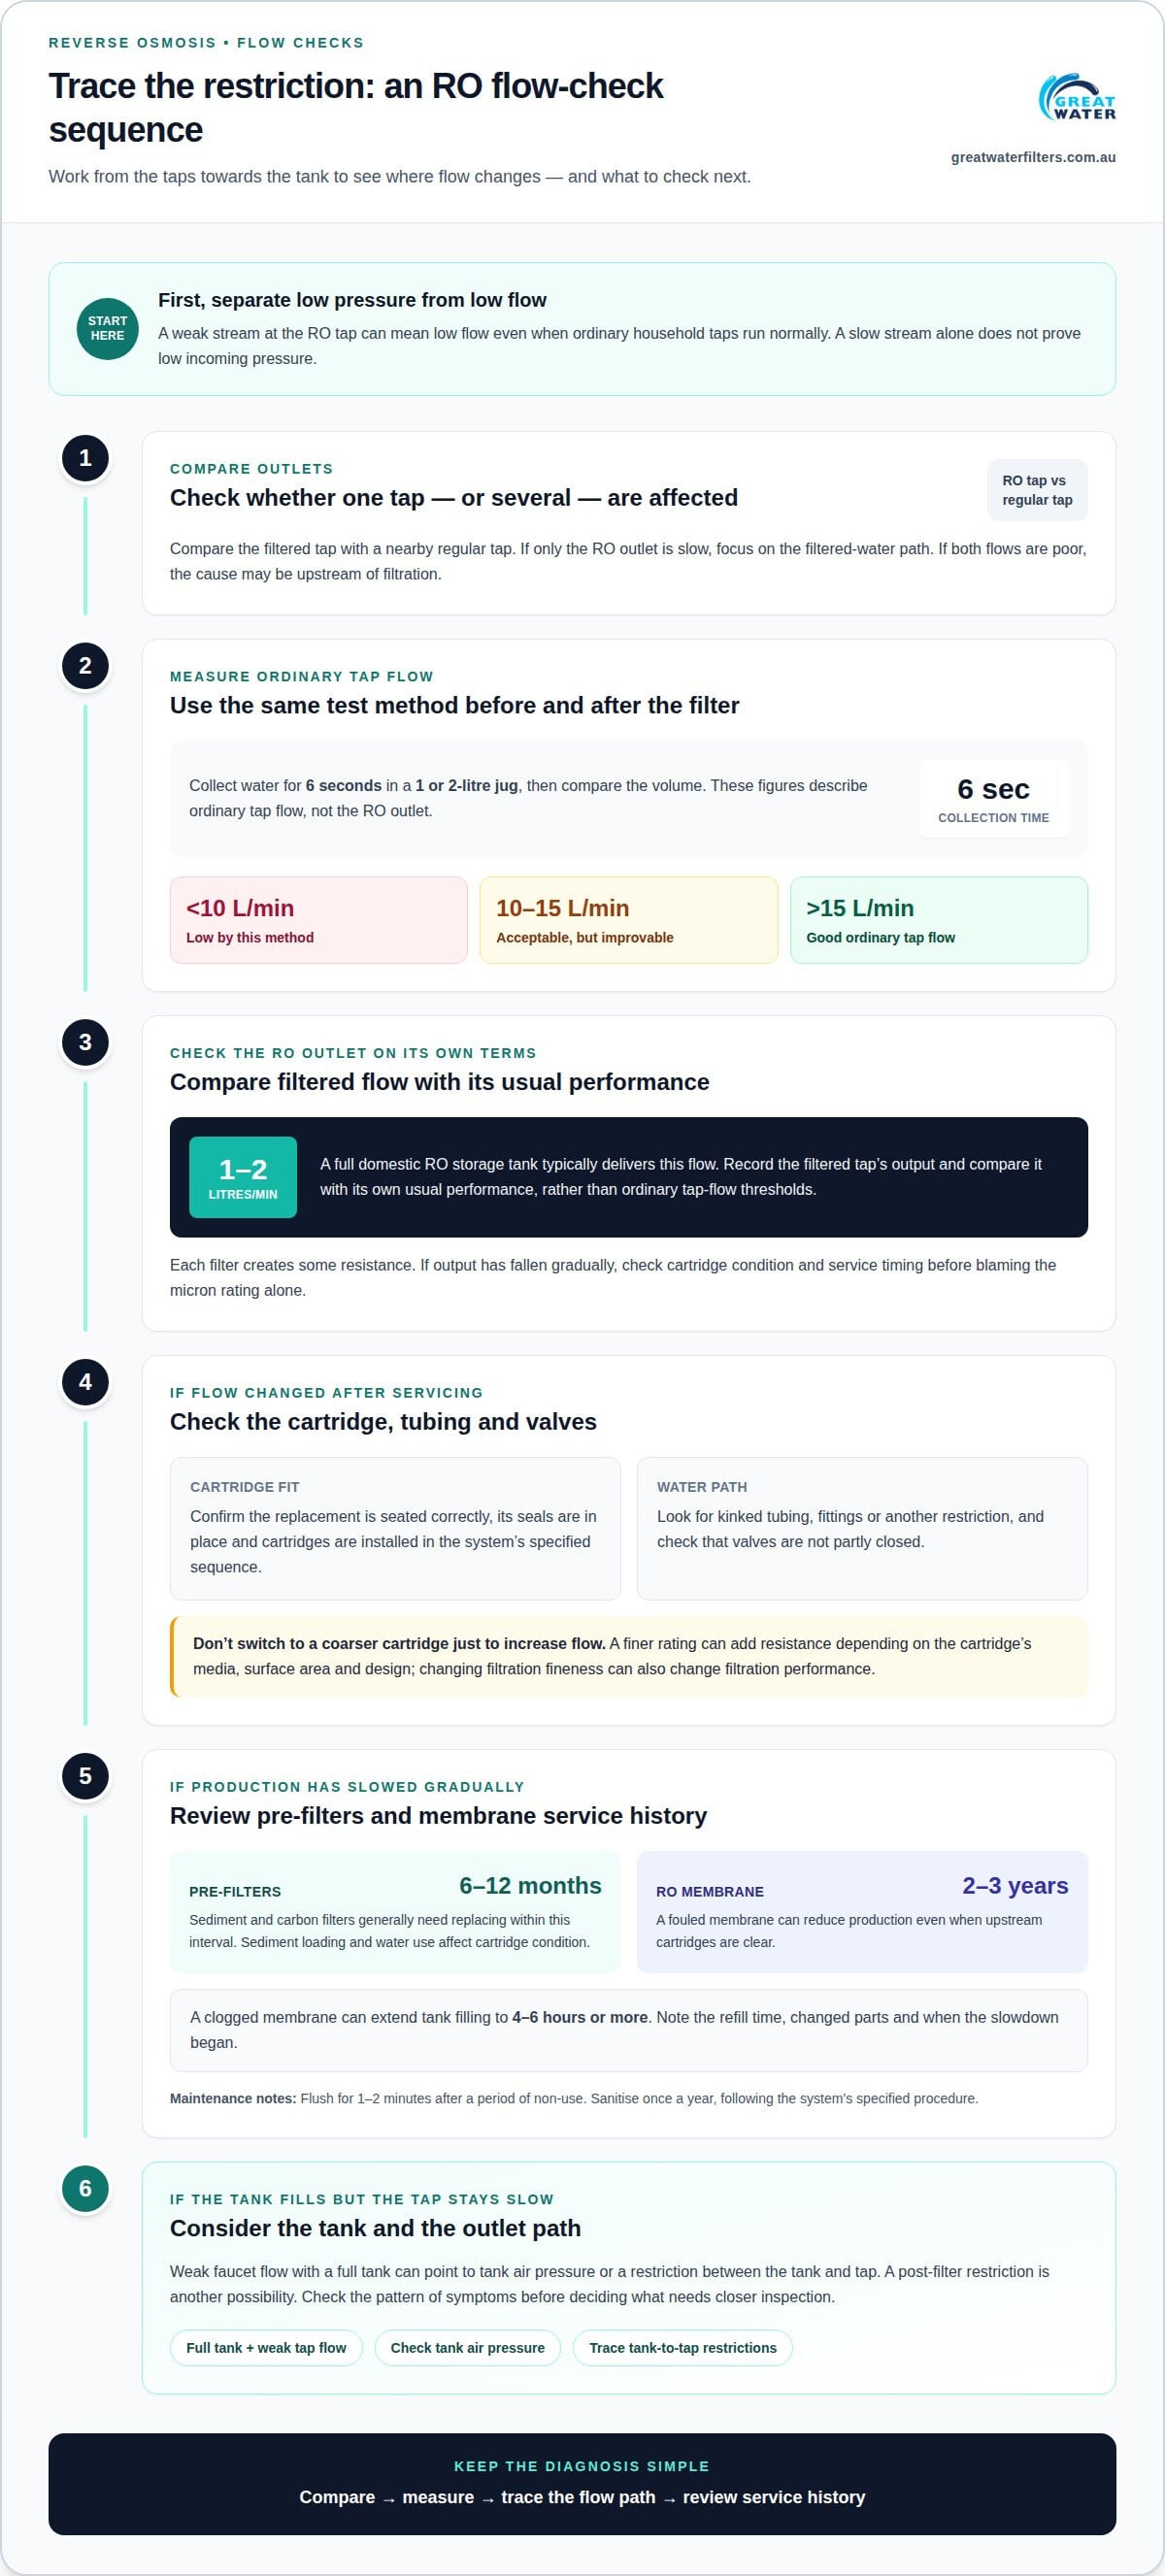
Compare the filtered tap with a nearby regular tap, and note whether the issue affects one outlet or both. Pressure is the force pushing water through plumbing; flow is the volume delivered over time. A weak stream at the RO tap can indicate low flow even when household taps run normally. A slow stream alone does not prove low incoming pressure.
- Measure a regular tap before and after the filter, using the same outlet and test method. Collect water for 6 seconds in a 1 or 2-litre jug, then compare the volume. A rate below 10 litres per minute is low by this measurement method; 10 to 15 litres per minute is acceptable but improvable, while above 15 litres per minute is good. These figures describe ordinary tap flow, not the RO outlet.
-
Check Flow Through Filters
Record the filtered tap’s output and compare it with the regular tap’s result. A full RO storage tank typically delivers 1-2 litres per minute, so assess that outlet against its own usual performance. Each filter creates some resistance. If flow has fallen gradually, inspect cartridge condition and service timing before blaming the micron rating alone.
- Compare cartridge specifications and design, not just the micron rating. Finer filtration can restrict flow more, depending on the media, surface area and rated flow. A new cartridge may still feel restrictive if it is undersized for household demand. Filter and housing designs also affect how easily water passes through each stage.
- Track where the flow changes. If the regular tap works well but the RO tap runs slowly, the restriction is likely in the filtered-water path. If both flows are poor, the cause may be upstream of filtration. A full tank with weak faucet flow can point to a post-filter restriction or a blockage between the tank and tap.
- Do not automatically install a coarser cartridge to increase production. Changing filtration fineness can also change filtration performance. Match the cartridge to the system’s design, then consider its age, water use and rated capacity. A gradual decline may indicate loading; low flow from the start points more towards sizing, flow or installation conditions.
Blocked pre-filters and membrane performance
For troubleshooting reverse osmosis system low pressure in Perth, begin with the pre-filters and their service history. A clogged sediment filter can restrict feed water, while a fouled RO membrane can reduce production even when upstream cartridges are clear.
-
Inspect Pre-Filters for Clogs
Check the sediment and carbon pre-filters for age and accumulated particles. As they capture sediment, resistance can increase and less water reaches the membrane. If a cartridge blocks quickly, consider incoming sediment, household water use and the cartridge’s rated capacity. Do not automatically switch to a coarser cartridge, as a different rating can alter filtration performance.
- Compare each pre-filter’s replacement date with its service interval. Pre-filters and sediment filters generally need replacing every 6 to 12 months, although sediment loading and water use affect cartridge condition. A gradual drop in output makes overdue or clogged filters worth inspecting. Record the date and flow symptoms before changing parts, so you can tell whether servicing affected performance.
-
Maintain the RO Filter and Membrane
Check the membrane’s age separately from the pre-filters. An RO membrane generally needs changing within 2-3 years, and fouling can slow production despite newly fitted pre-filters. Review its service record alongside the system’s use and rated capacity. For troubleshooting low pressure in a Perth reverse osmosis system, distinguish a membrane that has gradually lost performance from a restriction that began after maintenance.
- Install replacement cartridges in the sequence specified for the system. Make sure each is seated correctly and its seals stay in place. A misaligned cartridge can restrict flow; replacement media or a different micron rating may also affect resistance. After servicing, check whether the tank refills and outlet flow changes. If the restriction remains, avoid repeatedly swapping cartridges.
- Flush the system for 1-2 minutes after a period of non-use. Sanitise the RO system once a year, following its specified procedure. Flushing and sanitising are separate maintenance tasks; neither replaces a clogged cartridge or a membrane due for replacement. Keep both dates in the service record to help identify overdue maintenance when output changes.
- Note the tank’s refill time after filter maintenance. A clogged membrane can extend filling to 4 to 6 hours or more. If replacing overdue pre-filters doesn’t improve production, the membrane may be fouled or due for service. Record which parts were changed and when the slowdown began. That timeline helps separate normal cartridge loading from a pressure drop linked to recent maintenance.
What causes low pressure in my RO system?
A household reverse osmosis system generally needs 40-60 psi of incoming water pressure, with 60 psi the recommended sweet spot. If the pressure problem affects ordinary taps too, investigate the supply or property plumbing, not just the filter.
-
Check Incoming Water Pressure
Compare the RO system’s feed with water flow at a nearby unfiltered tap. A system needs at least 40 PSI to function well; below 275 KPA, it may not push water through the membrane or shut off. The ideal incoming range is 40-60 psi. A low reading at several outlets points towards an upstream supply, pressure-control or plumbing issue.
Check that the isolation and bypass valves are fully open. Partly closed valves restrict the water path, even when incoming household pressure is adequate. If regular taps also have weak flow, have a licensed plumber assess the household supply or plumbing rather than dismantling the RO unit.
-
Review Booster Pump Needs
Check the system design and pressure at its feed connection before considering a booster pump. Low incoming pressure reduces the force available to push water across the RO membrane, slowing production. A booster pump can raise feed pressure in a system designed for one, but it will not fix a blocked carbon filter, kinked tubing or closed valve.
If pressure measures below the system’s operating requirement, first identify whether the drop affects the whole property or only the RO feed. A pump must suit the system and its feed conditions. Don’t treat higher pressure as a universal fix; the example of 800 KPA in a system that would not shut off shows why pressure and shut-off operation need to be assessed together.
-
Test Feed Pressure and the Shut-Off Valve
Use a pressure gauge at the RO feed connection to measure incoming water pressure, then compare the reading with the system’s required range. To assess shut-off behaviour, observe whether water production stops as the storage tank fills. The automatic shut-off valve is described as closing when holding-tank pressure reaches 2/3 of feed pressure.
If a valve does not stop production, or pressure readings fall outside the operating range, avoid adjusting components by guesswork. Check that supply valves are open and tubing is not kinked. A persistent fault involving household pressure, controls or plumbing is a reason to call a licensed plumber.
- Check whether cloudy water clears in a glass after 30 to 60 seconds. That pattern can indicate trapped air rather than low feed pressure. Run the RO system for a day or two; trapped-air cloudiness usually resolves during normal use. If the water remains cloudy alongside weak output, investigate the feed, filters and system operation separately.
Storage tank air pressure and re-pressurisation
A full storage tank with weak faucet flow can indicate low tank air pressure. Check the tank only when it is empty, as water inside affects the reading.
-
Check Storage Tank Air Pressure
Turn off the feed and drain the storage tank completely before measuring its air pressure. Use a pressure gauge at the tank’s Schrader valve, the same type of valve found on a tyre. An empty RO tank should read 7 to 8 PSI. Some guidance recommends 7 PSI when empty, so follow the specification for your tank where available.
-
Adjust Tank Pressure
With the tank empty, use a hand pump to add air through the Schrader valve, then check the gauge again. Gradually work towards the correct empty-tank pressure rather than adding air while the tank contains water. Excess pressure can affect how much water the tank stores and delivers. If water comes from the Schrader valve, the bladder may be ruptured, not simply under-pressurised.
-
Address Slow or Incomplete Tank Filling
After checking pressure, reopen the feed and time how long the tank takes to refill. An RO storage tank normally takes 2 to 4 hours. A much longer fill can point to restricted production, while a tank that fills but delivers weak flow may have low air pressure. Note whether the tank reaches capacity or stops filling early.
- Compare the symptoms before and after draining the tank. If the tap starts with a strong stream, then slows as stored water runs out, the tank’s air charge may be low. If the tank itself remains partly empty, investigate water production and the feed path too. Repressurising will not clear a blocked filter or restore a membrane producing water slowly.
- After adjusting air pressure, let the system refill and test the faucet again. A full tank supplies stored water under pressure, with the air cushion helping push water towards the tap. If flow remains weak once the tank is full, check the path from tank to faucet rather than repeatedly adding air.
- Record the empty-tank reading and the refill time after maintenance. For example, noting a reading of 7 PSI and a refill period of 2 to 4 hours gives you a baseline for future checks. If water leaks from the Schrader valve or the tank won’t hold air, stop repressurising and arrange an assessment of the tank.
Troubleshooting a pressure drop after cartridge replacement
If flow drops immediately after a cartridge change, start with the new cartridge and the parts disturbed during servicing. Different filter media or a micron rating can alter resistance, but incorrect seating or another restriction can also reduce delivery.
- Compare the filtered tap’s flow with its usual output before changing anything else. Note whether the drop began immediately after replacement or developed gradually. An immediate change makes the service work a useful place to start; a slow decline may indicate cartridges loading with sediment. Check whether the tank still fills and whether the problem affects only the filtered outlet.
- Turn off the water supply before opening the housing, then check the replacement cartridge’s direction and seating. A skewed or incompletely engaged cartridge, or a displaced seal, can impede water flow. Refit it according to the system instructions. Do not force the housing closed, as this can damage the seal or leave the cartridge incorrectly positioned.
- Compare the old and new cartridges by model, micron rating and media type. A finer rating or different media may create more resistance, depending on design and surface area. Check that the cartridge matches the system specification instead of choosing a coarser filter simply to increase flow. That change may alter filtration performance.
- Inspect the connections disturbed during the change, including tubing, small fittings and valves. A kinked line, narrow passage, blocked strainer or partly closed isolation valve can restrict flow regardless of the filter media. Straighten visible bends and confirm the valves are fully open. Restore the supply, then compare filtered flow with your record from before servicing.
- If the new cartridge is seated correctly, isolate the stages to find where flow stops. Check the water reaching the pre-filter inlet, then assess the outlet path and post-filter. If water still does not flow after checking the pre-filter and post-filter, the manifold may be one possible cause. Avoid repeated cartridge swaps if the restriction is in the manifold or another component.
- After correcting a visible restriction, restore the supply and let the system refill before judging faucet flow. A quick test can mislead if the tank was partly drained during servicing. Check again once it has refilled, then record the cartridge model and change date. This helps distinguish a replacement-related pressure drop from a normal decline over time.
Great Water Filters: ES5Q Hi Flow Wellness Whole House Water Filter System
The ES5Q Hi Flow Wellness Whole House Water Filter System is an option to consider when you want filtration beyond a single RO tap. Great Water Filters offers it alongside the Elite Series 3 Reverse Osmosis Water Filter System and Whole House Water Filter Softener, helping you consider a system that suits your home’s needs. Explore Smarter & Healthier water filter systems with Free Installation Australia wide and Transparent upfront Pricing. The purchase terms include “100% No Risk”, “No Upfront Payment Required” and “Only Pay when Fully Installed & Happy.” Contact Great Water Filters to discuss your water filtration needs.
Make your next system check more useful
Treat pressure changes as useful information, not just an inconvenience. For troubleshooting reverse osmosis system low pressure in Perth, note when the change began, what was serviced beforehand and whether it affects only the filtered tap or other household outlets too. This gives a technician a clearer starting point and helps distinguish a recurring restriction from a change following maintenance.
Keep system details and recent cartridge information with your notes. Avoid making several adjustments at once: changing one factor at a time helps show what affects flow. If pressure remains inconsistent, an assessment can help identify whether the cause is in the filtration system or elsewhere in the property’s plumbing.
Clear observations make the next step easier to choose, whether the system needs routine maintenance, a correctly matched replacement or attention to a separate plumbing issue. Let the symptoms guide each step, rather than relying on guesswork, to work towards dependable filtered water.
A steady, methodical check is a practical way to work towards a lasting solution.
Frequently Asked Questions
Is a small leak under the unit serious?
Treat any leak as a fault, even if it is only a few drops. Turn off the RO system’s feed valve, dry the area and place a container beneath the leak. Check whether water is coming from a housing seam, tubing connection or tap line. Do not keep using the system while water continues to escape; note where the leak is before arranging an assessment.
Why is only my filtered kitchen tap slow?
If other household taps run normally, focus on the filtered outlet rather than the property’s general supply. Check that the filtered tap moves freely and its spout or aerator is not obstructed. Look for a kink in the connecting tube or a valve that was not fully reopened after maintenance. A slow filtered tap can also indicate a restriction in its dedicated filter path.
How do I diagnose low water pressure in a reverse osmosis system?
Note whether weak flow affects every tap or only the RO outlet, and whether it began after a cartridge change. Check that the supply and isolation valves are open, then inspect visible tubing for sharp bends. If you have a suitable pressure gauge, measure at the system’s feed connection. Keep the readings and symptoms together so each check helps narrow down a different part of the water path.
How can clogged pre-filters or membranes cause low RO water flow?
A loaded pre-filter restricts water reaching later stages, while a fouled membrane can reduce purified-water production. The symptoms may differ: a restriction before the membrane limits its feed, while membrane fouling can leave the storage tank refilling slowly. Consider service dates alongside household use. If new pre-filters do not restore production, the membrane may need attention.
How do I check the RO system’s tank air pressure and bladder?
Drain the tank fully before taking an air-pressure reading at its Schrader valve; water remaining inside can distort the result. An empty tank should read 7 to 8 PSI. If water comes out of the Schrader valve, the bladder may have ruptured. Don’t try to correct that symptom by adding air. Record the reading and whether the tank holds pressure for an assessment.
When should I replace RO filters or the membrane to restore pressure?
Use the system’s service schedule, cartridge capacity and actual water use to guide replacement, rather than flow alone. Pre-filters and sediment filters generally need changing every 6 to 12 months; an RO membrane generally needs changing within 2-3 years. Earlier replacement may be needed if heavy sediment or use loads a cartridge. If flow stays low after filter changes, assess the membrane and other restrictions.
How do I flush and sanitise a low-pressure reverse osmosis system?
Flush the system for 1-2 minutes after a period of non-use. Sanitise it once a year, following the system’s specified procedure.
COMMENTS